Published August 29, 2017
Panel Actors make it trivially easy to write User Interface Actors. Each UI is just an actor. When you need to communicate between your UIs, you just send it actor framework messages. It’s super easy to get started, and here’s how.
Creating a Panel Actor
- Inherit from Panel Actor.lvclass
- Implement your UI in your actor’s “Actor core.vi”
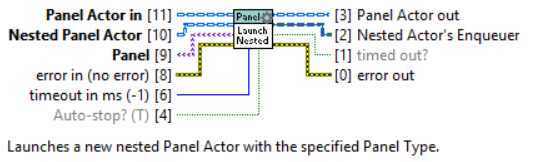
- Launch your actor using “Launch Root Panel” or “Launch Nested Panel”
That’s it! When you launch a Panel Actor, you need to specify the panel type. When the actor is launched Actor core’s front panel is inserted into the specified panel.
Panel Actor Features
Panel Actors provide an extremely versatile interface for creating modular, professional user interfaces. Here are some of the features.
UI Initialization
Writing professional code is very important. Something that always looks amateur is when the UI is displayed before its contents are populated. Panel Actors help provide an easy way to prevent this. The Panel UI is not shown until your Panel Actor calls the parent implementation of Actor core.vi. This means that if you need to pre-populate you UI with any data you just need to do it before the “Call Parent Method” node. This could mean simple things like populating a control or more complex things like launching nested panels.
Initialization Waiting
When Panel Actors are launched the node waits for the UI to be initialized. Use this to pre-populate the UI (including all nested subpanels) before showing the front panel.
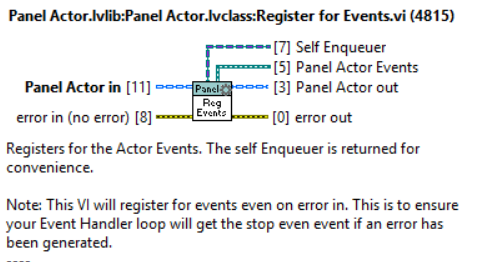
Panel Actor Events
Panel Actors throw a few events. Since most of the time your panel actors will have an Event Handler helper loop, these events can be registered for. These events will tell you when the actor has been initialized and stopped, as well as when the Panel itself changes state. The most important of these events is the Actor.Stopped event. This event is thrown when the actor is stopped. This event is helpful for terminating your event handler Helper loop. See the examples included in the package for more information about Panel and Panel Actor events.
Panel Helper
The Panel Helper class is designed to give developers an easy way to interface with the panel, no matter what type of panel it is. This helps with deferring updates, setting the mouse busy, and other panel specific tasks. The Panel Helper is valid even if the panel type changes.
Tiered Panels
The Panel Actor assumes that the most specific implementation of Actor Core contains the UI to be shown. This means that if you have an inheritance tree, in which all levels contain a UI, by default the framework would only show the most specific.
For Example:
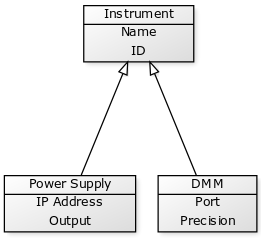
We would like to keep our UIs modular, and cohesive. It’s possible to include the UI for configuring Name and ID (from the Instrument class) in both the Power Supply and DMM UI’s. This would lead to some redundant code though. Ideally, we would like to implement the Name and ID UI in the Instrument class, and the Power Supply’s specific UI in the Power supply class, and DMM’s UI in the DMM class. This is what Tiered UIs let us do.
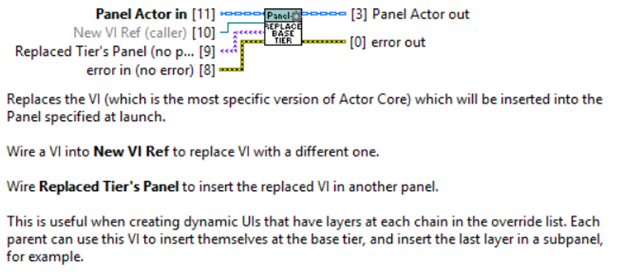
A Panel Actor can call the method “Replace Panel Tier.vi”. What this does is tell the framework “Hey, ignore what you were going to put in the base panel, and put this instead.” By default, the calling VI will be the replacement. At the same time, you specify where to put the panel that is being replaced. This can be no where (in which case the replaced UI would never be shown) or it can be any type of panel.
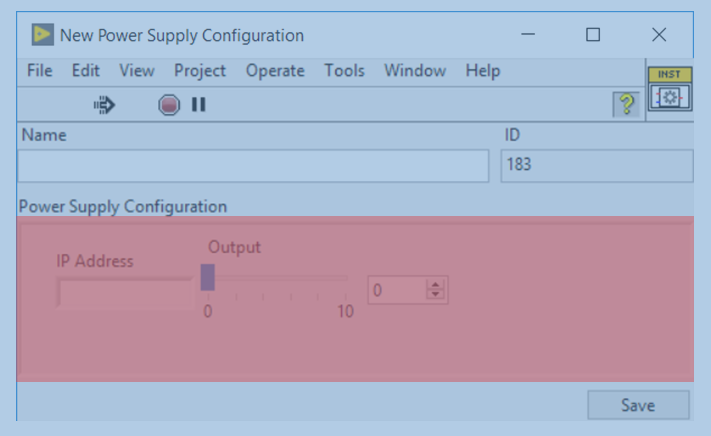
In the above example, the items highlighted in blue are part of the Instrument class. The items highlighted in red are part of the Power Supply class. The Power Supply class just writes its code to configure the power supply. The Instrument class writes its code to configure generic instruments. The Instrument also has a subpanel in it though. When “Replace Base Tier” is called it specifies a Subpanel as the destination for the replaced tier. This lets us build complex UIs for our classes, while keeping everything nicely encapsulated. Using subpanels we can stack layers and layers of controls. This keeps us from having to duplicate code and simplifies development and testing. See the “Panel Actors – Tiered Panels” example for more info.
Panel Actor Messages
A Panel Actor has a few extra messages.
- Show Panel Message – Shows the Panel. What this does will depend on the specific panel type.
- Hide Panel Message – Hides the Panel. What this does will depend on the specific panel type.
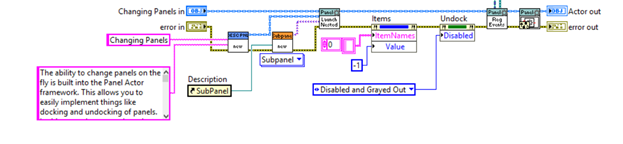
- Change Panel Message – Changes the type of panel to display the Panel Actor in. This lets you easily implement something like Docking and Undocking into a subpanel.
Additionally, a Panel Actor can send a message to itself to launch a Nested Panel using the “Send Launch Nested Panel.vi” method.
Panel Actor Event Loop
The package includes one template VI. It is a basic Event Handler Loop that is a good starting point for all Panel Actors. It registers for the Actor Stopped event as well as some other helpful events.
Panel Actors take the Panel interface to the next level. They allow you to create dynamic, modular, object oriented interfaces quickly and easily. Be sure the check out the Panel Actor examples included in the package for all of the example code.