Published March 29, 2022
Introduction
You have probably been in this situation before: you have a bunch of classes in your project with configuration data and you want to be able to edit them in the UI and store them on disk, but they don’t all have a common ancestor. Maybe some of them are Actors and others are not. The natural solution is to use interfaces, and now LabVIEW has them. This article will show how to use a “Configurable” interface that’s applicable to Actors and non-Actors, handles UI and disk, and works great with tiered configuration where parts of some classes’ configuration are stored in an abstract parent and other parts are in various children.
Code
You can find the framework and all example code in our public GitLab repo.
Example Application
Here is an example application developed for the purpose of showing how the configuration framework can be used (there are of course many different ways to use it, and this just shows some of the main useful features):
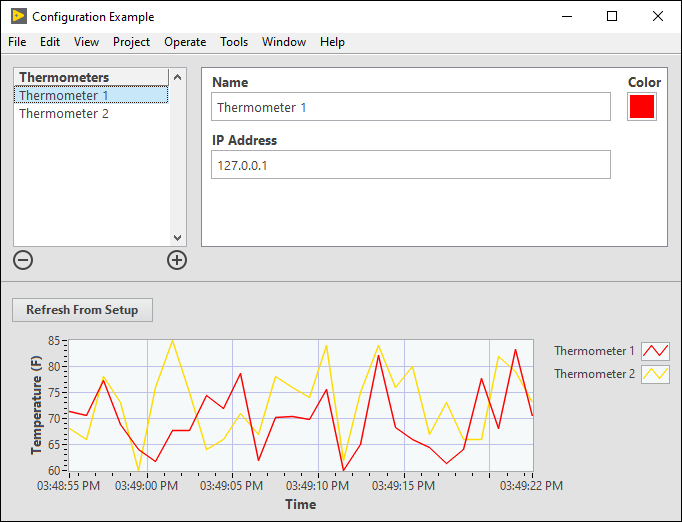
In this example, the user can add a number of thermometers and set the configuration for each one. Each thermometer has a name and a color (for how it will appear on the graph) as well as other configuration info related to the hardware setup. This information is saved to disk so that each time the application starts up, it loads from file and remembers the configuration the user previously set.
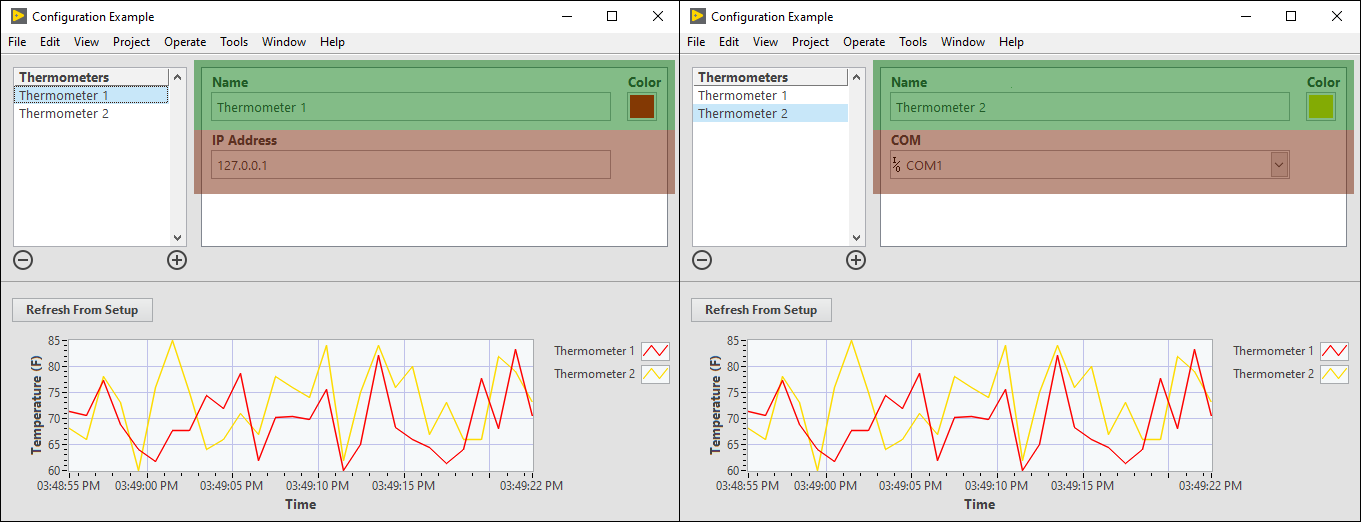
Now notice that there can be two different types of thermometers. They both have the same space for configuring the Name and Color (the green highlighted area), but they have different hardware related configuration (the red highlighted area) - one needs an IP address and the other needs a COM port. This is implemented by having the two thermometer types (“Modbus Thermometer” and “I2C Thermometer”) inherit from a shared parent (“Thermometer”), which is in charge of that shared configuration, while the children are in charge of the more specific configuration. This way we have tiered configuration.
Framework Diagram Part 1
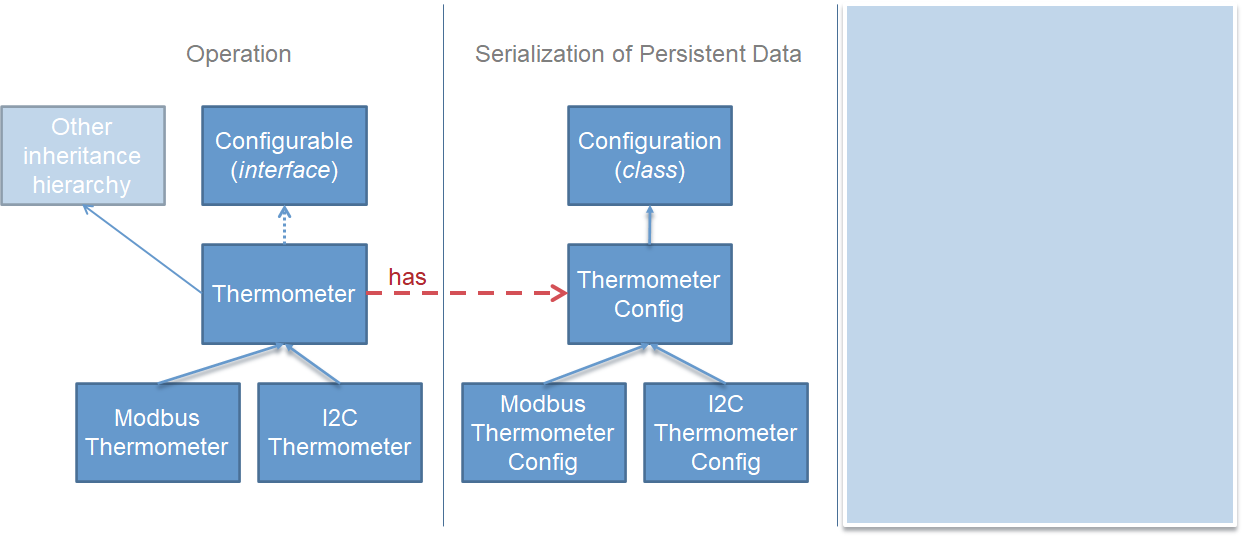
The first step in understanding the configuration framework is to learn about the idea of the “Configurable” interface and the “Configuration” class. Any class that you want to be configurable can inherit from the “Configurable” interface, and because it is an interface, that class can still have whatever other inheritance heirarchy you want - whether it is an actor or inherits from some other class. This allows our framework to be very flexible because any class can be configurable.
Along with each “Configurable” class, you also need to create a matching “Configuration” class. While the “Configurable” class defines the actual operation of the class (for example, in the case of the thermometers, it would define how to read temperatures from the actual hardware device), the “Configuration” class just defines the exact data needed to configure the “Configurable” object and how that data will be serialized (written to file) and loaded from file. The reason that this is a separate class is to allow more modularity and flexibility. Stephen Loftus-Mercer describes here why it is not a good idea to make a serializable class an interface. So for these reasons, all configuration classes you create must strictly inherit from the abstract “Configuration” class. The separation from the “Configurable” class allows you to still have “Configurable” classes with any other inheritance heirarchy that you want.
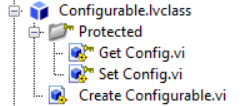
The “Configurable” interface has two required override methods, “Get Config” and “Set Config” - this is because an interface cannot have class private data, but we still want to require that any class inheriting from “Configurable” has a “Configuration” object in its private data. The “Create Configurable” method is a constructor which will help you get the correct type of Configurable when you are creating one - we will talk more about how it does this later.
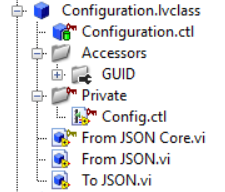
The “Configuration” class has two overrideable methods: “From JSON Core” and “To JSON”. This is where each inherited class can specify how configuration data specific to that class should be written to and read as JSON. For the other methods, The GUID accessor is just a unique ID and it’s helpful for all the Configurations to have a unique ID so you can easily know which is which.
Serialization Details
Here is an example of how a “Configuration” object writes itself to JSON.
1 | { |
The $type section defines the specific class type (in this case “Modbus Thermometer”), and you can see that each layer in the class heirarchy gets its own section. First there is the most specific one “Modbus Thermometer”, which has the hardware specific configuration like the IP address, then there is the more generic “Thermometer” which has generic configuration like the name and color. This could continue for more levels of inheritance as well.
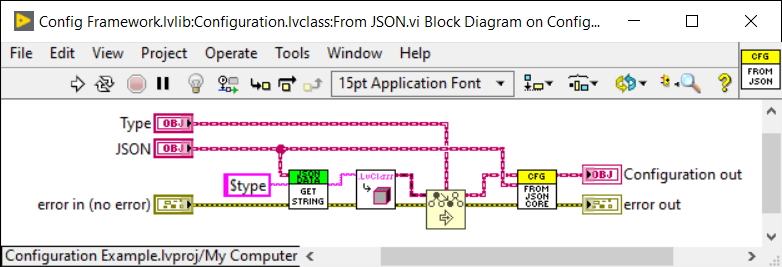
In “From JSON”, we create the class based on the $type section and the JSON and then “From JSON Core” is used so each class up the chain can read the data from its section of the configuration file (“From JSON Core” requires to call parent method). “To JSON” does basically the reverse of this - the “Core” is not needed in this case because the type of the object is already known from the beginning in this case.
Framework Diagram Part 2
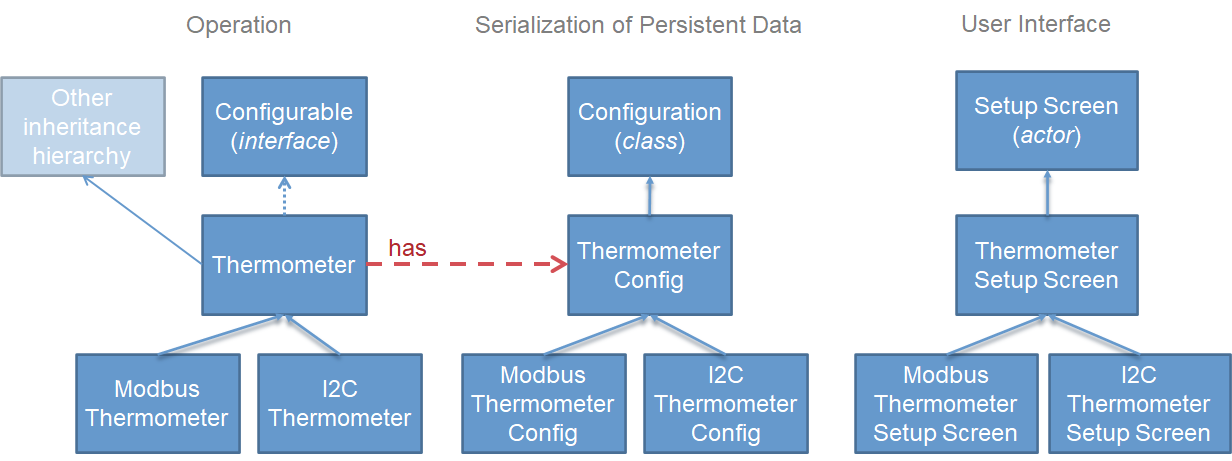
Now back to this figure, but we are adding another thing. Since the Configurable might be an actor and have it’s own user interface for it’s operation, we need to have a separate place where we specify the UI for setting up the configuration itself specifically. That is going to be our Setup Screen. It is a Panel Actor so that it is easy to place it in a subpanel. If you have your own framework and don’t want to use Panel Actor, you can create your own Setup Screen that fits into your framework, for example if you want it to be a JKI State Machine Object.
Setup Screens
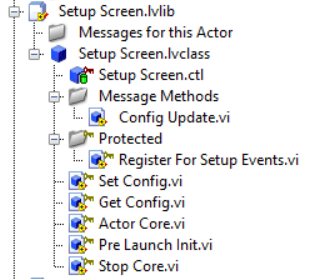
You can see that the setup screen has “Get Config” and “Set Config” methods. That means it is actually itself a special type of Configurable. This is because it owns a Configuration, the configuration that the user will be editing. This means we can use the same “Create Configurable” method to give us a Setup Screen that has matching type to the Configuration that we input.
“Config Update” is a message method that runs when the user makes changes to the configuration - you might think that this is not necessary since we know when the user has done that in Actor Core, but remember there could be changes that happen up or down the inheritance tree and we might want to know about them.
“Actor Core” is where the UI for the configuration will be defined. For example, you will probably have a bunch of controls for each piece of configuration data in that class type. If you create your own Setup Screen that is something other than an actor (like a JKI State Machine Object), then you would need your own way of implementing an “Actor Core” that gets displayed to the user.
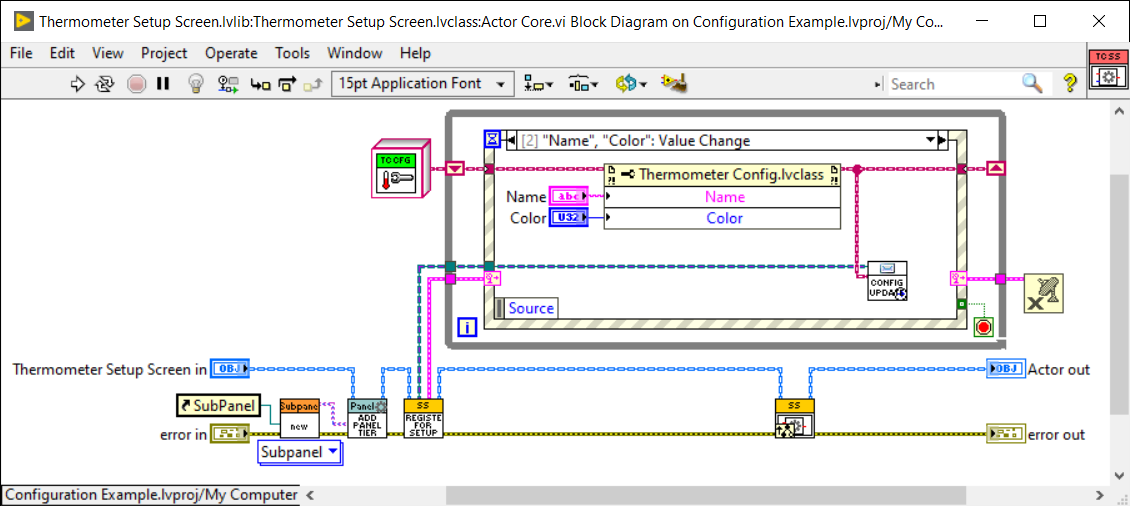
Here is an example for how to implement the Actor Core of the Setup Screen. The “Add Panel Tier” VI lets us place children Actor Cores in the subpanel so that we can continue having more and more layers of configuration down the inheritance chain. For example in this case, all thermometers have a Name and Color, and then another panel tier will be inserted for the more specific config, either IP Address or COM Port.
In the event structure, When the user changes the value of one of the controls, we must send the “Config Updated” message which will inform the calling actor as well as all the helper loops in the inheritance chain (everyone registers in the “Register For Setup” method) about the change. This is how the calling actor can find out about configuration changes and respond approriately - either just updating the new config in memory or writing it to disk, depending on desired functionality. Just make sure the calling actor inherits from Config Update Reciever so it can receive this message.
Putting Everything Together - The Splash Screen
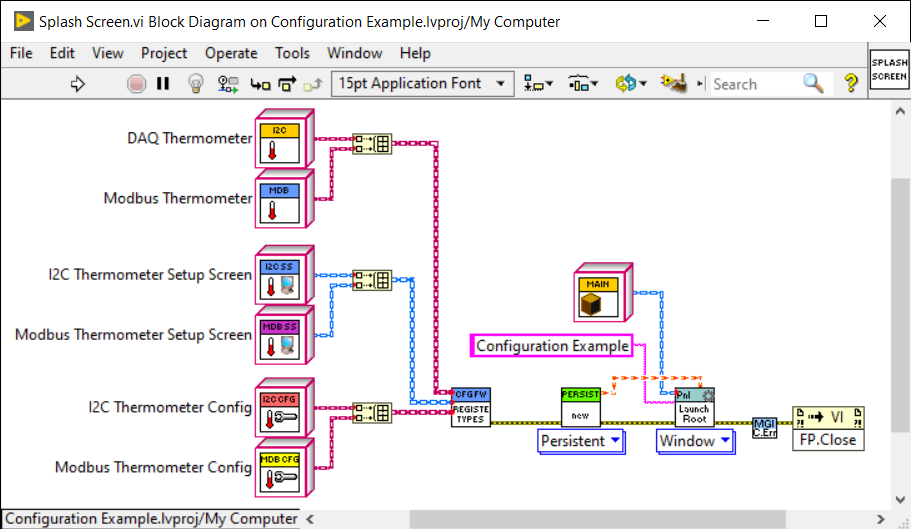
In the splash screen we register all of the different types. These are stored in a global so that in the application, we can access them to tell what types are available.
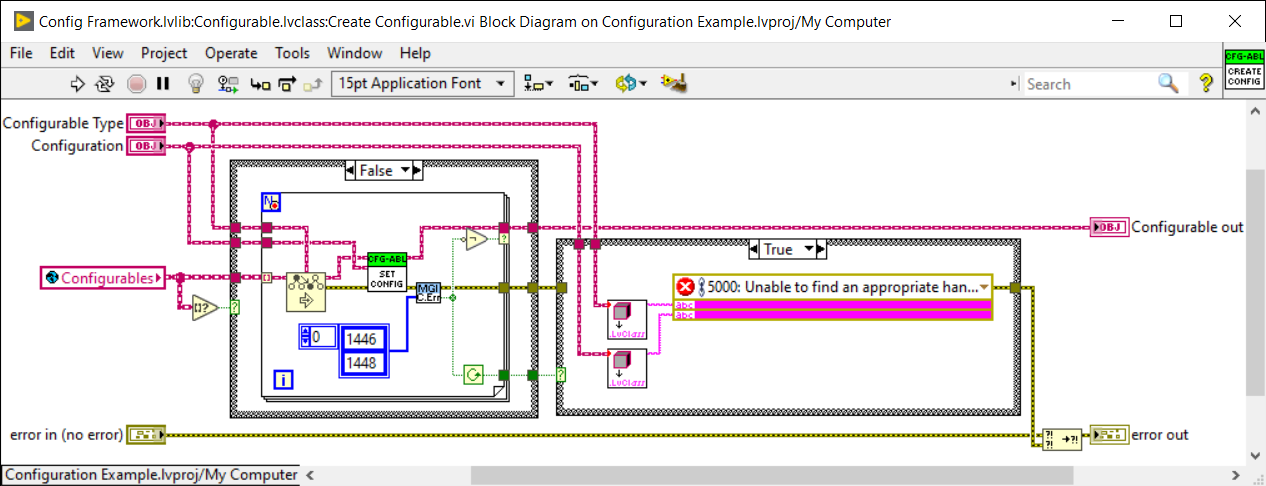
When you use the “Create Configurable” constructor, it goes through all the registered types and outputs the first one that has the correct type. Correct type means it is [a descendant of] the Configurable Type specified, and it will accept the type of Configuration given. This way you can create Setup Screens, thermometer objects etc. This works great in our example because we have a list of configurations and we can just ask to create an abstract Thermometer, and it will create thermometers of the correct type (Modbus or I2C) based on each one’s configuration, but we can treat them as all being abstract and we don’t have to worry about the specific type from at that higher level.
You can also create multiple setup screens where one setup screen registers all the classes and another registers only a subset of them if you want to quickly and easily implement a more expensive “pro” version of your software and a cheaper one that doesn’t have all the features.